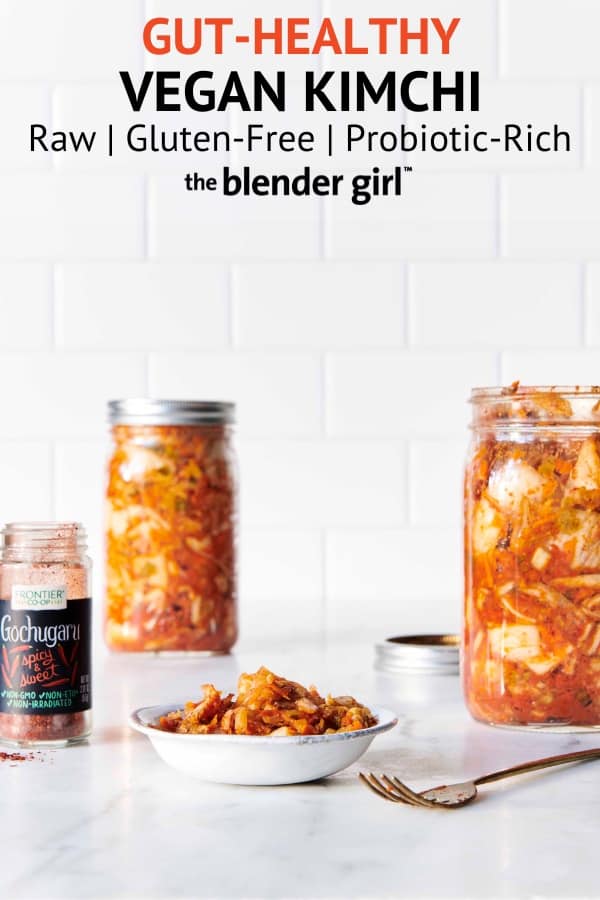
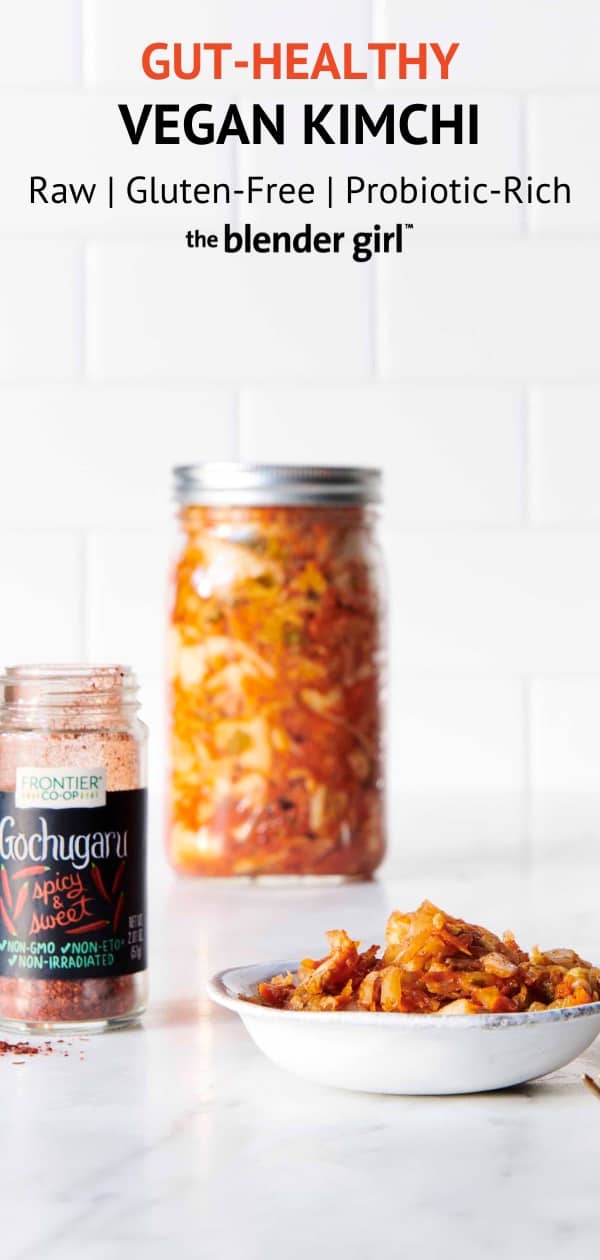
The Best Vegan Kimchi Recipe
This vegan kimchi recipe is absolutely delicious, tastes pretty close to conventional Korean kimchi, and is loaded with beneficial probiotics to support better gut health and digestion. You may have tried the fermented sauerkraut recipe here on the website or the kraut recipes in The Blender Girl cookbook or The Perfect Blend cookbook. Those kraut recipes and this vegan kimchi is all on heavy rotation in my house, not only to add fabulous flavor to dishes, but also to support better gut health and digestion.
I developed this vegan kimchi recipe for participants of my 60-Day Reset to help them achieve better gut health. One of the best things you can do to improve your digestion is to consume probiotic-rich foods, chiefly fermented plant foods such as kimchi, fermented sauerkraut, fermented pickles, kefir, beet kvass, and other probiotic-rich foods.
My dietitians and I recommend consuming some fermented sauerkraut or kimchi with lunch and dinner to improve digestion and promote detox. But, some people in our programs don’t like the taste of sauerkraut, but really enjoy the taste of this vegan kimchi! So, if you want to eat cultured vegetables to improve your gut health, but plug your nose and want to vomit every time you even think of eating sauerkraut, you may prefer this vegan kimchi recipe, too!
What is kimchi traditionally made with?
Kimchi is a traditional Korean dish made with salted and fermented cabbage and other vegetables such as daikon, carrot, and green onion. There are a ton of different kimchi recipes, and different regions and families have their favorite ingredients because everybody has a preference for how kimchi should taste. Many recipes include garlic and ginger, and other seasonings, and of course, the signature Korean chili flakes, called gochugaru. Most kimchi recipes also include fish sauce to add an umami note. Kimchi typically has a sour, salty, savory, and spicy flavor. But, not always. White Kimchi (Baek Kimchi) does not contain any chili, and is actually though to be the original variety of Korean kimchi. Try different varieties to see which one you prefer.
My Kimchi Obsession
I absolutely love kimchi, so I love to try different varieties wherever I go. Last year, I tasted the best kimchi I have ever tasted in my life! And, it was vegan! This vegan kimchi was so beautifully balanced and had a bouquet that just kept opening. I turned the jar over to learn more about the producer, and was excited to find out that they had a shop around the corner from where I live! (I can literally walk there in 5 minutes!) I thought, “I HAVE to meet the person who made this incredible vegan kimchi.” So, I walked around the corner to the The Fermentary and was so excited to meet Sharon Flynn, one of the leading fermentation experts in Australia. So, of course she makes phenomenal kimchi, and a whole range of other delicious fermented foods. If you are in Melbourne, definitely check out this amazing shop. And, they teach fermentation classes so you can learn how to make kimchi, sauerkraut, pickles, beet kvass, milk kefirs, water kefirs, coconut water kefir, kombucha, shrubs, fire tonics, yogurts, lassis, cultured butters and dips, fermented dressings and sauces, labneh, koji, miso, natto, amazake, and many other things! I attended a kraut and kimchi class, and it was fantastic! Sharon is really generous with her recipes and knowledge. I learned a lot, met some fellow fermentation junkies, and walked away with a huge box of probiotic-rich goodies!
After learning about different kimchi varieties and tasting a lot of fermented veggies during the class, I became even more obsessed with fermentation! And, I’ve been experimenting every since with spectacular results.
I was inspired to create my own vegan kimchi recipe.
So, because I was creating vegan kimchi, I couldn’t use fish sauce or shrimp paste. So, I tried a bunch of different ideas for creating an amazing depth of flavor. But, because I developed this recipe for my 60-Day Reset, we omit soy products temporarily to accelerate the digestive tune up. So, I couldn’t use tamari or miso paste.
So, I’ve used some ground dried mushrooms and diced onion to bring in a fabulous flavor to the vegan kimchi paste! Don’t skip these ingredients or your vegan kimchi will not have the depth of flavor that makes it so fantastic! Likewise, you must have gochugaru (ground Korean chiles) to deliver a long gentle heat, slight smokiness, and a touch of sweetness to nail the signature kimchi flavor. I’ve kept the heat in this vegan kimchi relatively mild so it delivers a fiery punch without blasting your buds.
Resist the urge to reduce the garlic and ginger as they are also critical for achieving a balanced flavor. Daikon is a traditional element in kimchi, and is dynamite for detox. If you don’t have it, substitute with additional carrots. Because I have used yellow onion to boost the flavor of the vegan kimchi paste paste, I’ve kept the quantity of green onion smaller as it can be overpowering in larger amounts. But, add more to taste.
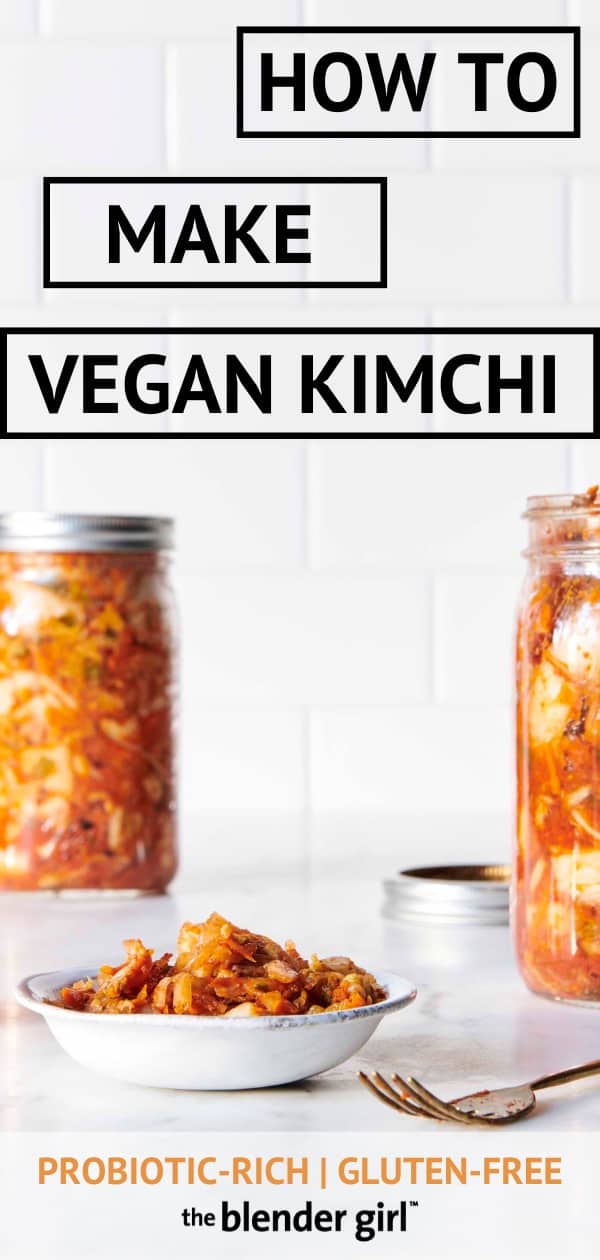
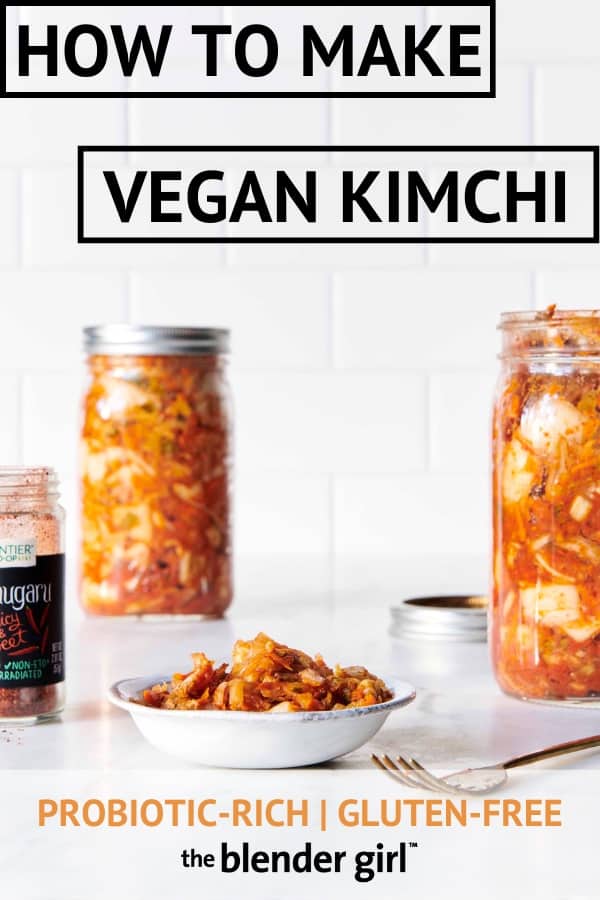
Vegan kimchi is really easy to make! Please don’t be put off by all of my notes and long instructions. I’ve deliberately provided a lot of detail to ensure you get consistent results, and you understand why each step is the way that it is. But, once you read the instructions once and make the recipe, you will be able to make this vegan kimchi quickly and easily! Please pay attention to the packing instructions to avoid the messy explosions that can happen when you make kimchi and other fermented foods!
What do you need to make kimchi?
To make this vegan kimichi, you will need:
- 2 (quart/liter) fermenting jars (see the notes below)
- 2 fermenting stainless steel lids with air-lock valve (see the notes below)
- 2 silicone rings (see the notes below)
- 2 sealing lids (see the notes below)
- 2 glass weights (optional; see the notes below)
- 1 pounder (optional; see the notes below)
JARS AND LIDS: You can make kimchi in a fermenting crock. But, jars take up less room, and then you only have to handle the kimchi once, rather than transferring it from the crock to canning jars. Ideally, you will have two fermentation jars with some kind of air-lock system that keeps oxygen out but allows gas to escape while fermenting.
Kilner has a simple kit that contains 2 quart (1L) fermenting jars, 2 simple air-lock lids, 2 silicone rings, 2 sealing lids (for storing in the fridge), and 2 glass weights. You can, of course, use more sophisticated fermentation air-lock systems. You can use a regular mason or ball jar with a sealable lid. If you choose this option, you may want to open the jars every couple of days to allow some of the gas to escape to prevent explosions. Wash your equipment thoroughly with hot water or place in the dishwasher with a natural detergent. A wooden pounder is useful to press the vegetables down when packing your jars, but you do not need one to make kimchi successfully. You can simply use your first or a small meat tenderizer to push the veggies down into the jars. Likewise, you do not need the weights. You could place a piece of carrot in the top of the jar to hold the veggies down. But, you will have some “juice” once you massage the paste into the veggies, and this liquid keeps the veggies in place.
What ingredient are in vegan kimchi?
WOMBOK: Otherwise known as Chinese cabbage or Napa cabbage. Make sure your wombok is very fresh for the best results when making kimchi. Your cabbage should be tight and firm with a heavy body and fresh leaves. Do not use wilted and floppy cabbage as it is past its prime and not suitable for making kimchi.
SALT: Use a high quality sea salt for the best results when making kimchi. Do not reduce the salt that is used to prepare the cabbage. This process is essential as it helps the cabbage to draw out water, gives it a crisp but pliable texture, helps it absorb the flavors of the kimchi paste, and aids the fermentation process. You will rinse the majority of the prep salt when you rinse the cabbage before coating it with the kimchi paste.
CARROT: I like to grate the carrot when making kimchi because it enables it to be evenly distributed through the cabbage and daikon, and then the kimchi is easy to eat. Alternatively, slice it thinly into half moons.
DAIKON: Also known as Japanese radish or Chinese radish, this root vegetable looks like a white carrot (with a green tinge at the top) and has a subtle, slightly sweet flavor that is much milder than a red radish. Purchase daikon at Asian grocers, health food stores, and some conventional markets. Daikon is a fantastic source of vitamin C, folate, and antioxidants, and boosts detox and immunity, and boosts the nutrition of the kimchi. Substitute with additional grated carrot, and your kimchi will still be delicious.
GREEN ONIONS: Because we’re using yellow onion in the kimchi paste, I’ve kept the green onion light as it can get overpowering in larger amounts. Add more after you taste the coated cabbage mixture before you place the kimchi in the jars.
SPRING WATER: Use spring water that is rich in minerals for the best results when making kimchi and other fermented foods. But, you can substitute with filtered water.
GOCHUGARU: Also known as Korean chili flakes, Korean hot pepper flakes, and Korean chili powder, this is an essential ingredient when making kimchi, and is widely available from Asian grocers and online retailers. Delivering a long gentle heat, a lovely smokiness, and a touch of sweetness, gochugaru is one of the things that gives kimchi its signature flavor. These coarsely ground, sun-dried Korean chile flakes might look similar to other flakes and powders on the market, but the texture and taste is very different. Do not use Gochujang (Korean chile paste) as it has soybeans, rice, barley malt, and salt mixed in and has a different flavor and texture. Do not substitute red pepper flakes, chipotle chile powder, or cayenne pepper in this recipe as they deliver a sharp, spicy hit rather than the long, gentle warmth of the gochugaru, and will also not give the kimchi paste its signature deep red color. I got some gochugaru from Frontier Coop and it was great!
YELLOW ONION: I like the sharper notes of the yellow onion for making vegan kimchi paste. But, you can substitute with white or red onion.
GARLIC: Use fresh garlic cloves and firmly pack your 1/3 cup measurer for the best results with your vegan kimchi paste. Do not use jarred minced garlic or your kimchi could have a funky flavor.
GINGER: Use fresh ginger root and mince it using a ginger grater right before making the kimchi paste for the best results. Do not use dried powdered ginger or pickled ginger in this kimchi recipe.
COCONUT AMINOS: If you’re not participating in my 60-Day Reset or choosing to be soy-free, you could substitute the coconut aminos with wheat-free tamari for a deeper, richer flavor in your kimchi paste. If you choose to use soy sauce, reduce the salt to 1/2 teaspoon (3g), and add to taste until you get the balance that you like.
COCONUT SUGAR: This mineral-rich sugar has a lower glycemic index, so I thought it was a healthier choice to balance the flavor of the kimchi paste. You can substitute with organic cane sugar. But, do not use sugar substitutes such as monk fruit and stevia to make kimchi. You do need some sugar to support the fermentation process.
MUSHROOM POWDER: As we are not adding fish sauce to the vegan kimchi paste, we are using mushroom powder to add an umami note to the kimchi. This is simply ground dried mushrooms, not medicinal mushroom powder or proprietary mushroom seasoning powder. You can purchase dried mushroom powder from health food stores or online retailers. Look on the ingredients panel and it should simply say “ground mushrooms (shiitake, porcini etc). Or, make your own mushroom powder by roughly chopping dried shiitake or porcini mushrooms (or a mixture), and placing them in a spice grinder or coffee grinder. Process until they are finely ground into a powder. On average, 2 tablespoons (2g) of chopped dried mushrooms will yield about 1 tablespoon (3g) of powder.
OK. Once you have all of the required ingredients, making vegan kimchi is actually really easy! Again, do not be put off by the long instructions. I just want to make sure you get great results!
How To Make Vegan Kimchi.
Wash and cut the wombok: Remove and discard the outer leaves, and discard any damaged or discolored leaves. Set aside two large leaves to place on the top of your mixture when sealing the kimchi. Wash the remaining wombok by placing it under some running water. Pat it dry. Place the wombok on a large cutting board, and using a sharp chef’s knife, slice it in half lengthways, leaving the core in tact. Then, slice each half into four equal pieces lengthways, and slice those pieces sideways into bit-sized square-shaped pieces.
Salt the wombok: Transfer the cabbage to a very large bowl or pot. Sprinkle the salt over the cabbage, and use your hands to gently massage it into the cabbage. Allow the cabbage to sit out at room temperature for 2 to 3 hours to allow the cabbage to draw water out. (You could also cover the bowl with a breathable cloth and place it in the fridge overnight.) Your cabbage will so soft and wilted, and there will be water in the bowl.
Rinse and drain the wombok: Drain the wombok into a colander, and place into a clean bowl. Fill the bowl with filtered water, and swish the cabbage with your hands. Drain the cabbage into the colander, and leave the cabbage to drain for 5 to 10 minutes, or squeeze gently to remove the excess water. (Do not skip this step or it will dilute your kimchi.) Transfer the drained cabbage to a large, clean, dry bowl.
Mix the vegetables together: Into a large dry bowl, add the drained cabbage, carrot, daikon, and green onions, and use your hands or two spoons to mix until well combined.
Make the kimchi paste: Add the water, gochugaru, yellow onion, garlic, ginger, mushroom powder, coconut sugar, coconut aminos, and salt into your blender, and blast on high for 20 to 30 seconds, until the ingredients are pulverized and the mixture is well blended but still has a little bit of texture. (You could also blend until completely smooth.) You should have about 1 cup (318g) of kimchi paste.
Coat the vegetables: Transfer the paste to the bowl with the vegetables, and use your hands to massage the paste into the vegetables until evenly coated. (You may want to wear disposable gloves.) As you massage the veggies, they will produce “juice”. This is great, as you will need this juice to pack the kimchi into the jars!
Pack your jars: Using a spoon, transfer small amounts of the coated veggies to the jars, and use your first or a pounder to pack the vegetables in tightly to ensure there are no air bubbles. (The mixture will release juice as you do this.) Leave about 1 inch at the top of your jar to allow room for the vegetables to expand and the juices to grow as the kimchi ferments and gas is produced. If you pack your jars all the way to the top, not only will it be very difficult to open the jars (as the gas will seal them shut) and the kimchi may explode out of the jars when you do get them open! Also, the juice will spill out through the release valve or lid, and make a mess in your kitchen.
Seal your jars: Once you’ve packed your jars, roll up a piece of one of the outer cabbage leaves you set aside (I like the firm harder pieces), and place it in the opening of the jar to cover the contents of the jar. Press down with your fingers so that the juice pools up over the top of the cabbage leaf. Place a weight (or chunk of carrot or clean stone) on top of the cabbage leaf to ensure the kimchi stays under liquid. Seal your jar with the fermentation air-lock lid or regular lid. (If you have leftover vegetable mixture, place it in a smaller jar to ferment. Or, consume it as a salad now!)
Allow your kimchi to ferment at room temperature: Store your jars at room temperature away from direct sunlight for 3 to 7 days, depending on the temperature of your environment. The ideal temperature for fermenting kimchi is (46-64°F (8-18°C). You may hear the mixture “hissing”, “fizzing”, “bubbling”, and “popping” as it comes alive. It is not uncommon for the fermentation lid to leak “kimchi juice”. Simply wipe the lid or pour the liquid off. (It is a good idea to place the jars on a board or plate to catch the juice.) If you’re using a regular sealed canning jar, you may want to open the jars quickly every couple of days to allow some of the gas to escape. You also may need to drain a little bit of the juice (this is a great probiotic tonic) or even remove some of the expanded veggies and eat them as a salad if you have packed your jars too tightly. Kimchi can be consumed at every stage of fermentation, and is ready with great flavor and beneficial probiotics anywhere from 3 days to one week after packing it in your jars. Taste your kimchi to determine when it is “ready”. This is a matter of personal preference. It is ready when it is slightly bubbly, has reached your preferred level of tang, and has a balanced fiery flavor. In the hotter weather, your kimchi may be done at the 3-day mark. In warmer weather, you are safer to ferment for a shorter period of time (2 to 3 days) at room temperature, and transfer your kimchi to the fridge for 2 to 3 weeks to ferment slowly rather than risk it exploding or spoiling. At average temperatures, kimchi will typically take 5 to 7 days to bubble and get tangy. In the colder weather it may take 7 to 10 days, or even longer, to develop and come alive. The “slow and low” approach of fermenting in the colder weather (41-50°F (5-10°C) for 2 to 3 weeks delivers a beautifully nuanced kimchi with deep, bold flavors. You will get a feel for what you like, the more you make kimchi. Once you’ve made this recipe once, you may decide to add more gochugaru, garlic, ginger, sugar, and salt for your next batch.
Once your kimchi is ready, remove the fermentation lids and rubber rings of both jars, and replace them with the sealable lids. If you’re using regular canning jars, open the jars to release the gas, and seal them back on again. Transfer the sealed jars to the fridge, where the kimchi will continue to ferment, but at a slower rate.
Allowing another week or two in the fridge for your kimchi to mature will not only enable the proliferation of beneficial probiotics, but also deliver more nuanced flavors.
You should have about 2 quart jars (8 cups/1.9kg) of kimchi.
I would say that a good serving is 1/4 cup (60g). If you have not eaten kimchi before, start with 1 tablespoon (15g), and monitor how your body responds to the chiles and the fermented vegetables, and then gradually increase the serving according to your flavor preferences.
How to store kimchi.
Keep your kimchi stored in the fridge, and consume within 6 months. If your kimchi develops a sour flavor, it can still be added to stir-fries and grains for delicious meals.
The best way to consume vegan kimchi.
This vegan kimchi can be enjoyed at every stage of fermentation. But, I encourage you to be patient and allow your kimchi to ferment to 2 to 3 weeks for the most exquisite flavor.
A great strategy for better health is to include a few different probiotic-rich foods each day to nourish your body with a variety of beneficial micro-organisms. So, I start my day with coconut water kefir, then I consume some almond milk, beet kvass, or water kefir throughout the day, and I also consume 1/4 cup of fermented sauerkraut, fermented pickles, or this vegan kimchi with lunch and dinner. I mix things up and do different things each day.
Kimchi is not only great for your gut, but it adds fabulous flavor to stir-fries and stews, and is a delicious addition to stirred salads, cooked grains, or added to power bowls!
If you don’t want to make your own kimchi, you can purchase it, but just look for quality kimchi.
What to look for when buying commercial kimchi.
You can find high quality kimchi (made without citric acid) at health food stores and some mainstream grocers in the fridge section, or from Asian markets or specialty stores. Only purchase kimchi in glass jars, as the acidity can draw chemicals out of plastic containers. Don’t purchase kimchi from the shelf stable section of the grocery store. It may taste good, but it doesn’t contain any beneficial probiotics. Also, be careful of choosing kimchi that been pasteurized or has citric acid listed in the ingredients.
I know it is easier to buy commercial kimchi, but set some time aside, and make this vegan kimchi. It really is delicious.