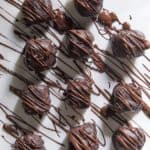
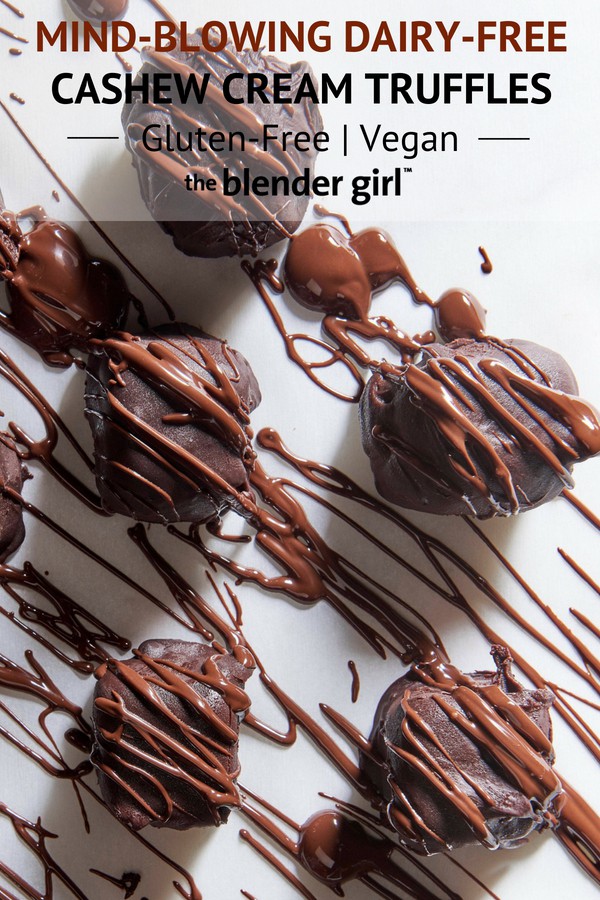
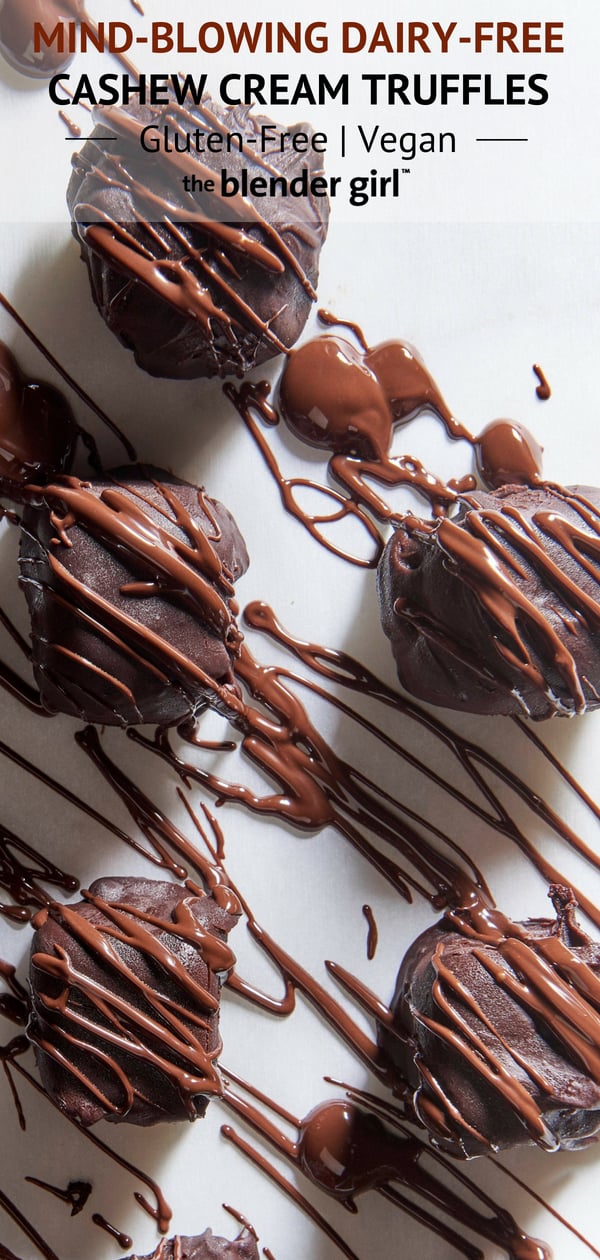
Vegan Chocolate Truffles
December 6, 2014
These vegan chocolate truffles made with cashew cream are exquisite from master vegan baker, Fran Costigan. These sweet treats make incredible gifts.
Vegan Chocolate Truffles
These vegan chocolate truffles made with cashew cream are exquisite from master vegan baker, Fran Costigan. These sweet treats make incredible gifts.
Prep Time 4 hours
Total Time 4 hours
Servings 30 to 36 Truffles
Ingredients
thick cashew cream:
- 5 oz (1 cup/142g) raw unsalted cashews, soaked and drained
- 2/3 cup (160ml) filtered water (at room temperature)
- 1/4 cup (60ml) pure maple syrup
- 1 teaspoon natural vanilla extract
- 1/4 teaspoon guar gum
truffles:
- 1 cup (240ml) Basic Thick Cashew Cream (recipe above)
- 7 oz (198g) dark chocolate (70%)
- 1 teaspoon natural vanilla extract
tempered chocolate:
- 10 oz (283g) dark chocolate (70 to 75%), divided
Instructions
-
To make the cashew cream, drain the cashews in a strainer. Put the rinsed nuts into a blender and add the water, agave or maple syrup, and vanilla. Blend, starting on low, and quickly increase the speed to high. Blend for about 1 minute until the cream is perfectly smooth.
-
If you are using a standard blender, stop the machine and push any pieces of unblended cashews down into the cream; blend for an additional minute.
-
With the motor turned off, add the guar gum directly onto the cream, making sure it doesn’t land on the sides of the container. Blend on low for 30 seconds, then increase the speed to high and blend for 1 minute. Pour and scrape the cream out of the blender while it is warm, it is very thick.
-
Pour the cream into a container, cover, and refrigerate for up to three days or freeze for up to two months. I freeze cashew cream in silicone ice cube trays, defrosting only the amount I need and giving the defrosted cream a good whisk before using. Store the frozen cubes in a zipper-lock bag until needed.
-
To make the truffles, pour the Basic Thick Cashew Cream in a small saucepan and set aside.
-
Chop or break the chocolate into pieces, then process in a food processor until powdered. Add the chocolate to the cashew cream and cook over very low heat, stirring slowly and constantly with a silicone spatula until the chocolate is about two-thirds melted, about 1 minute.
-
Immediately remove the saucepan from the heat and continue to stir gently until the chocolate is completely melted and the ganache is smooth. Stir the vanilla into the ganache.
-
Line an 8 x 8-inch / 20 x 20-cm pan with parchment paper large enough to hang over the sides. Spoon the ganache into the pan and smooth the top. (You want to make a block of ganache that is 1⁄2 to 1 inch / 1.3 to 2.5 cm-thick.) Refrigerate for 2 to 3 hours until firm and then transfer to the freezer. Freeze for 4 hours or overnight until quite firm.
-
When the ganache is firm, remove from the freezer. Lift the block onto a cutting board with the help of the parchment paper. Square the edges with a sharp knife and cut the block into squares. Work with half or even a quarter of the block at a time, keeping the rest refrigerated. (If the ganache gets too soft to cut, just refrigerate until chilled and firm.)
-
To enrobe the truffles in melted chocolate remove the centers from the refrigerator about 5 minutes before enrobing. The centers should be chilled but not icy cold or the coating might crack.
-
Pour the melted, or melted and tempered chocolate into a deep bowl. (See instructions for tempering below.) Drop a chilled truffle center into the chocolate, and use a chocolate dipping fork to make sure it is submerged. Use the fork to remove the truffle. Hold it over the bowl to allow the excess chocolate to drip back into the bowl, and wipe the bottom of the truffle gently on the side of the bowl. Place on parchment close together but not touching. Repeat with the rest of the centers. Dip a fork in the melted chocolate and wave over the truffles to create a decorative drizzle. Alternatively, spoon chocolate into a small pastry bag. Cut a very small tip, and squeeze chocolate lines onto each truffle. Refrigerate briefly to allow the coating to harden.
-
To dust the truffles in cocoa powder, pour the cocoa powder into a fine mesh strainer and lightly sift the cocoa powder over the truffle squares. (If the squares are very cold, the cocoa may not adhere. If that happens, allow them to soften slightly for a few minutes.) You could also coat them in melted chocolate and the dust with cocoa powder.
-
Refrigerate the finished truffles until set.
-
To Seed Tempered Chocolate, chop 2 ounces / 57 grams of the chocolate into medium chunks and set aside until needed.
-
Finely chop the remaining 8 ounces / 227 grams of chocolate. Place in a heatproof bowl set over a saucepan of barely simmering water. Stir once or twice with a silicone spatula until the chocolate is almost, but not completely, melted. The chocolate should be about 100 to 110°F / 38 to 43°C now. If not, keep stirring.
-
Remove the bowl from the saucepan to the counter, and add the reserved pieces of unmelted chocolate (the “seeds”). Whisk the seeds vigorously until they are melted. Check the temperature. When the temperature drops into the low 80s, you want to slowly bring it back up to between 88°F and 90°F / 31°C and 32°C over the warm water. This is the working range you need for dipping.
-
Spread a small amount of melted chocolate on a plate; the chocolate should harden in a few minutes and remain shiny. If it doesn’t, repeat the tempering process.
Recipe Notes
Recipe from Vegan Chocolate © 2013 by Fran Costigan
Photo by Trent Lanz; styling by Alicia Buszczak
Comments
Resources
There are no results.


Comments 3
Thanks for sharing.
I know it won’t come out exactly the same, but any thoughts on using coconut butter in place of cashews in this recipe?
I think you will get a very oily result Heather.